Corey, Sheila
Corey is recovering HAM3 from a HEPI L4C trip. We are also going to raise the threshold for the L4C WD to 99000.
If this level is good enough to protect the suspensions, it seems like it should be permanently at this level to avoid unnecessary trips. How can we make this change permanent?
I'm using the same filters for ITMX pit as ETM pit, here are spectra showing the performance. In the red traces both Pit and Yaw damping are on, in the blue traces only Yaw damping is on.
The second screen shot shows the Coil driver outputs, the dashed lines are with only Yaw damping on, the solid lines are with both PIT and Yaw damping on. I will leave all four OpLev admping loops running for now, ITMX+ETMX PIT+Yaw.
As of 9 am, I've adjusted the Y-bound fiber pol state to : -38.4 - 48.3 +57.15
In this state, I'm seeing ALS-Y_FIBR_TRANS_DC .0023 mW (needs calibration, the reading last night was 0.007 mW and I was having a bit of trouble aligning to it), and ALS-Y_FIBR_REJECTED_I 0.0063 mW. We'll see if the power meter tells the same story.
Power Outage recovery continues at LLO
Morning Alarms:
Hrmm, OK. Since I sincerely doubt the re-install of h1susomc had anything to do with the mode cleaner re-locking, I don't think there's a smoking gun here. The reboot of MC2 was at 17:47:18 PDT, 4 minutes before, and the iop model for HAM2 was reinstalled earlier at 17:46:14 PDT. Hurumph. This is still a mystery and Tuesday afternoon was still waste of time then!
The ITMX Yaw oplev damping is now working, with feedback to the PUM only.
I am using a verry similar loop to the one for ETMX, but this time I had to add a low pass at 5 Hz to avoid saturating the DAC at high frequencies. I am using a gain of 1 and the first three filter modules in ITMX_L2_OLDAMP. The open loop gain measurement and spectra showing the performance are attached.
With these three opLev damping (ETMX PIT, YAW and ITMX YAW) loops engaged the cavity lock is stable.
We need a sign flip in the COMM slow path to lock, this must be because of the sign flip in MC2 on tuesday morning.
COMM was locking stably for a while. I tried to make a comparison of the noise with OpLev damping on and off, but the measurement is not verry repeatable, so it was hard to make any conclusions.
I am going to leave COMM handed off over night, with the three opLev damping loops running, so there should be IR in the arm cavity for part of the night.
Using the green beam retro reflected by ETMY leaking into IR path, we found that the IR QPD path was off in YAW. I don't understand why/how, nobody touched this path since HIFO days, and this path worked in HIFO.
We fixed the problem by turning the pico mirror in the IR QPD path. Just tweek one mirror, and both of the QPDs were fixed.
Details:
There are many many many ghost beams because the reflectivity of IR HR for green is lower than that of IR AR, so we used foils to block ghost beams. It is easy to see the correct beam on QPDB, but was impossible to see the correct one on QPDA as the IR 50:50 acts as a good AR for green. Therefore, for QPDA, we looked at one specific ghost beam and used Kiwamu's calculation to set the ghost beam position right. At first both of the QPDs were off in the same direction by about the same amount. We twisted the TMS by giving it a bias offset and were able to bring the beam on QPDs to correct position. We removed the bias, tweaked one pico mirror until the beam positions were good. Unfortunately the green thing is so dim we couldn't see anything on the IR QPDs.
I noticed that one of the thicker cables running from the TMS ISC table to the top mass was half coming off of a J-clip on a post on the TMS ISC table on its own. I pushed the cable back in, and this made a large impact on the PIT of TMS such that we needed to rebalance.
There is some tension in the cable and this might be good enough to force the cable in the long run to creep out of the clip. Since the cable is stiff, once it changes its position there is an impact on the TMS balance. This might be the cause of mystery alignment jumps in OAT and HIFO days (i.e. cable creeps out of J-clip and settles to a new position).
We need to tighten J-clip some more tomorrow.
Remaining tasks tomorrow:
Here are a few photos from Thursday work. Took photos of Green beam on the Telescope mirrors, as well as our "bolt weight" which has a new position.
After this morning's adventure with the ETMX UIM driver, and thanks to Richard's help to fix it, I could take UIM to test mass pitch and yaw transfer functions. Drivealign filters were then designed in the same manner as Keita with the measurements from this morning. The last two pdf show the filter design, with the filter in cyan.
They are now installed in the L1 P2P and Y2Y drivealign matrix filterbank with a gain of 1, but need to be tested.
UIM data used for the fitting are under the svn and located in :
/ligo/svncommon/SusSVN/sus/trunk/QUAD/H1/ETMX/SAGL1/Data
2014-03-20_H1SUSETMX_P2PY_WhiteNoise.xml
2014-03-20_H1SUSETMX_Y2PY_WhiteNoise.xml
Since the top mass P2P and Y2Y drivealign filters disappeared, I reinstalled them, and the first two pdfs are showing the design.
Arnaud, Sheila
Today we worked on the OpLev damping more, including making the modification to the etmx and Itmx models needed to route the damping through the drivealign matrix for both PUM and UIM. These models (h1susetmx and h1susitmx) committed to svn.
The problem with the pitch loop saturating the DAC was the high frequency noise, as Keita suggested. I added a low pass at 10 Hz, and now the loop runs with the intended gain without saturating the DAC. The first screen shot attached shows the coil driver outputs with the loop in last night's configuration (dashed lines), and with both PIT and YAW damping loops engaged (solid lines). (The max is 130000 counts).
The next plot shows the performance of these loops (blue is both loops on, red is neither on). We get a factor of 5 improvement at 0.45 Hz in Pitch, and a factor of 10 at 0.13 Hz in Yaw. The Pitch RMS is reduced by 60%, while Yaw rms is reduced by 50%.
The Pitch loop gain is half of what I had originally indented, the current set up is shown in the attached screen shot.
While Corey and Keita were aligning the TMS, I kept myself busy touching up some of the alignments and clean-up tasks on ISCTEY. The refl path and WFS paths are nominally aligned, and I've observed that without my favorite anthropogenic noise sources in the chamber, the return beam is relatively stable.
I'm working with TMS offsets of PIT 20 urad, YAW 9 urad. Not all that bad.
IR:
I adjusted the polarization on the IR Path from its initial position to something closer to the nominal power given in the ISC End Station manual.
Also, my earlier concerns about the shorted power cable damaging the BBPD appear to be unfounded... that factor of 10 I had to add to the impedance was nicely accounted for by the gain switch on the hardware PD interface, which I had completely forgotten existed.
power | |
Laser output | enough* |
After attenuation | 38.7 mW |
IR mon PD | 310 uW |
BBPD | 18.4 mW |
*this power meter's filter didn't make it into the storage bag, no chance of measuring this one with the tools I have right now.
Green:
PD4 is aligned to the rejected Faraday beam. At this moment, the polarization coming from the laser in relation to the first Faraday appears to be slightly different from EX; I'm consistently measuring ~1.2% power rejected to EX's 1.9%. I've also adjusted the laser current to increase power to the chamber; I'd had it turned down to 0.97 A in an attempt to find the beatnote, and the polarization of the laser wasn't optimal for getting power into the rejection beam (it was initially about ~0.4% of input power). This may be why I was having such a hard time aligning PD4 earlier, there wasn't much there to find.
Also the REFL_A PD might need
power | |
Laser output | 53 mW |
After 1st Faraday | 49.1 mW |
On mon PD | 700 uW |
After 2nd Faraday | 41 mW |
At periscope | 40 mW |
At REFL_A PD | 12.87 mW** |
** at the PD I'm seeing flashes up to ~5 mW. Unclear if this is an alignment or calibration issue, will be tracking this down tomorrow.
I took advantage of an unusually quiet control room to apply updates to any available worksations. Updates have been run on opsws1-6, opsws8-10 (vm), operator0, and vacuum1. Additionally, opsws1-6, operator0, vacuum1 and alarm0 were moved to the new workstations subnet.
opsws0, opsws7, and operator1 still require the latest os updates. Of these, opsws0 and operator1 still need to be moved to the workstations subnet.
If the crew leaving EndY could ensure the SUS is damped and the HEPI watchdog is untripped, it would be much appreciated. ISI is locked and can be as is. Thanks, Hugh
As of 6:30 PM, HEPI watchdog is untripped and SUS is damping. She's all yours.
LVEA Laser Safe Hugh – Adding payload to HAM5 Aaron – Pulling cables HAM3, HAM4, & BSC3 Apollo – Drilling in LEVA wall for nitrogen line installation 09:42 Keita & Corey - Working on TMS at End-Y 10:05 Sheila – Restart ITMX model 10:26 Jim – Shutdown OAF 10:30 Richard – Adding ADC card to OAF 10:43 Hugh & Apollo – Adding Payload to HAM5 – Using Forklift 11:20 Jim - Restart OAF 12:00 Praxair – Delivering nitrogen 12:50 Filiberto – Going to End-Y and End-X to pick up items 12:50 Karen – Cleaning at End-y 13:20 Patrick – Taking down conlog for backup 14:00 Travis – Working in SUS LVEA cleanroom 14:13 Gerardo – Working in the H2 Laser enclosure 14:33 Craig – Working in the H2-PSL 14:35 Richard – Going to End-X 15:30 Sheila – Restart ETMX model
This completed the need for forklift action at HAM5 for the time. The Mass was placed on six 1"x1"x1/16". Will continue payloading (lighter stuff.)
Scott, Bubba, Hugh
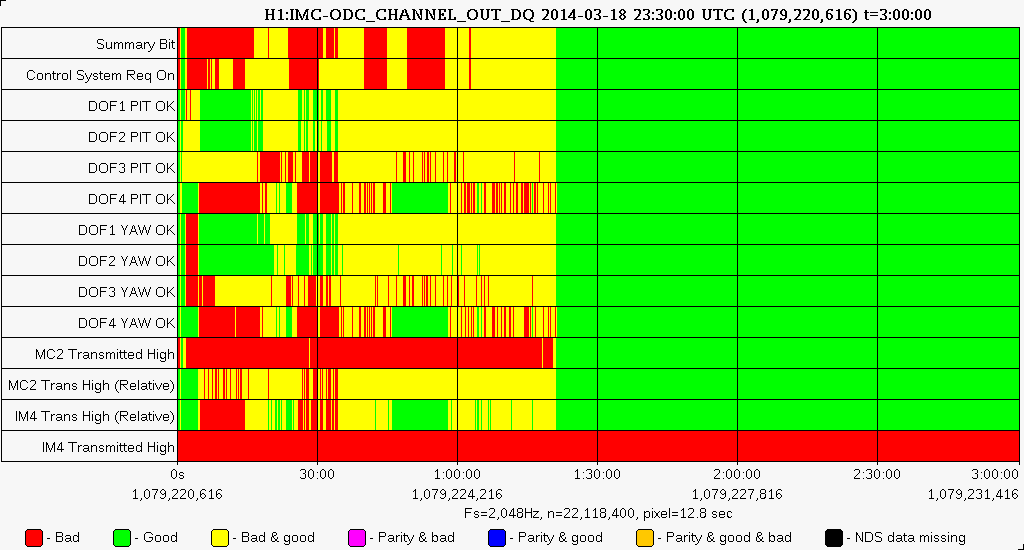
Jeff asked for an entry showing the order "make install-modelname" commands were issued yesterday afternoon to see if it has any link to the relocking time of the IMC. Note there is a bug in the file name were the month is actually the hour, this has been fixed.
Mar 18 16:39 install-h1susmc1_2014_39_18_16:39:15
Mar 18 16:40 install-h1susmc1_2014_40_18_16:40:25
Mar 18 17:41 install-h1iopsusb123_2014_41_18_17:41:18
Mar 18 17:41 install-h1iopsusb123_2014_41_18_17:41:34
Mar 18 17:42 install-h1susitmy_2014_42_18_17:42:10
Mar 18 17:42 install-h1susbs_2014_42_18_17:42:45
Mar 18 17:43 install-h1susitmx_2014_43_18_17:43:09
Mar 18 17:45 install-h1susmc3_2014_44_18_17:44:40
Mar 18 17:45 install-h1susprm_2014_45_18_17:45:21
Mar 18 17:45 install-h1suspr3_2014_45_18_17:45:41
Mar 18 17:46 install-h1iopsush2b_2014_46_18_17:46:14
Mar 18 17:46 install-h1susim_2014_46_18_17:46:39
Mar 18 17:47 install-h1susmc2_2014_47_18_17:47:18
Mar 18 17:48 install-h1suspr2_2014_47_18_17:47:52
Mar 18 17:48 install-h1sussr2_2014_48_18_17:48:24
Mar 18 17:49 install-h1sussr3_2014_48_18_17:48:48
Mar 18 17:49 install-h1sussrm_2014_49_18_17:49:10
Mar 18 17:49 install-h1susomc_2014_49_18_17:49:30
Mar 18 17:51 install-h1iopsusauxb123_2014_51_18_17:51:13
Mar 18 17:51 install-h1susauxb123_2014_51_18_17:51:37
Mar 18 17:54 install-h1susauxh2_2014_54_18_17:54:05
Mar 18 17:54 install-h1iopsusauxh34_2014_54_18_17:54:54
Mar 18 17:55 install-h1iopsusauxh56_2014_55_18_17:55:40
Mar 18 17:56 install-h1susauxh56_2014_56_18_17:56:07
Mar 18 17:56 install-h1iopseib1_2014_56_18_17:56:43
Mar 18 17:57 install-h1iopseib2_2014_57_18_17:57:06
Mar 18 17:57 install-h1iopseib3_2014_57_18_17:57:33
Mar 18 17:58 install-h1hpiitmx_2014_58_18_17:58:17
Mar 18 17:59 install-h1iopseih16_2014_58_18_17:58:59
Mar 18 18:00 install-h1hpiham6_2014_00_18_18:00:18
Mar 18 18:00 install-h1isiham6_2014_00_18_18:00:36
Mar 18 18:01 install-h1hpiham3_2014_01_18_18:01:21
Mar 18 18:02 install-h1isiham2_2014_01_18_18:01:47
Mar 18 18:02 install-h1isiham3_2014_02_18_18:02:15
Mar 18 18:02 install-h1iopseih45_2014_02_18_18:02:51
Mar 18 18:03 install-h1hpiham4_2014_03_18_18:03:14
Mar 18 18:03 install-h1hpiham5_2014_03_18_18:03:33
Mar 18 18:04 install-h1isiham5_2014_04_18_18:04:13
Mar 18 18:04 install-h1ioppemmy_2014_04_18_18:04:43
Mar 18 18:05 install-h1pemmy_2014_05_18_18:05:52
Mar 18 18:06 install-h1ioppsl0_2014_06_18_18:06:18
Mar 18 18:07 install-h1pslfss_2014_06_18_18:06:53
Mar 18 18:07 install-h1pslpmc_2014_07_18_18:07:15
Mar 18 18:07 install-h1psldbb_2014_07_18_18:07:37
Mar 18 18:08 install-h1iopoaf0_2014_08_18_18:08:12
Mar 18 18:08 install-h1peml0_2014_08_18_18:08:37
Mar 18 18:09 install-h1tcscs_2014_09_18_18:09:02
Mar 18 18:09 install-h1odcmaster_2014_09_18_18:09:26
Mar 18 18:10 install-h1omc_2014_09_18_18:09:57
Mar 18 18:10 install-h1iopasc0_2014_10_18_18:10:25
Mar 18 18:10 install-h1amcimc_2014_10_18_18:10:59
Mar 18 18:11 install-h1sushtts_2014_11_18_18:11:30
Mar 18 18:15 install-h1ioppemmx_2014_15_18_18:15:36
Mar 18 18:16 install-h1pemmx_2014_15_18_18:15:54
Mar 18 18:16 install-h1iopsusey_2014_16_18_18:16:22
Mar 18 18:16 install-h1iopsusex_2014_16_18_18:16:38
Mar 18 18:17 install-h1susex_2014_17_18_18:17:06
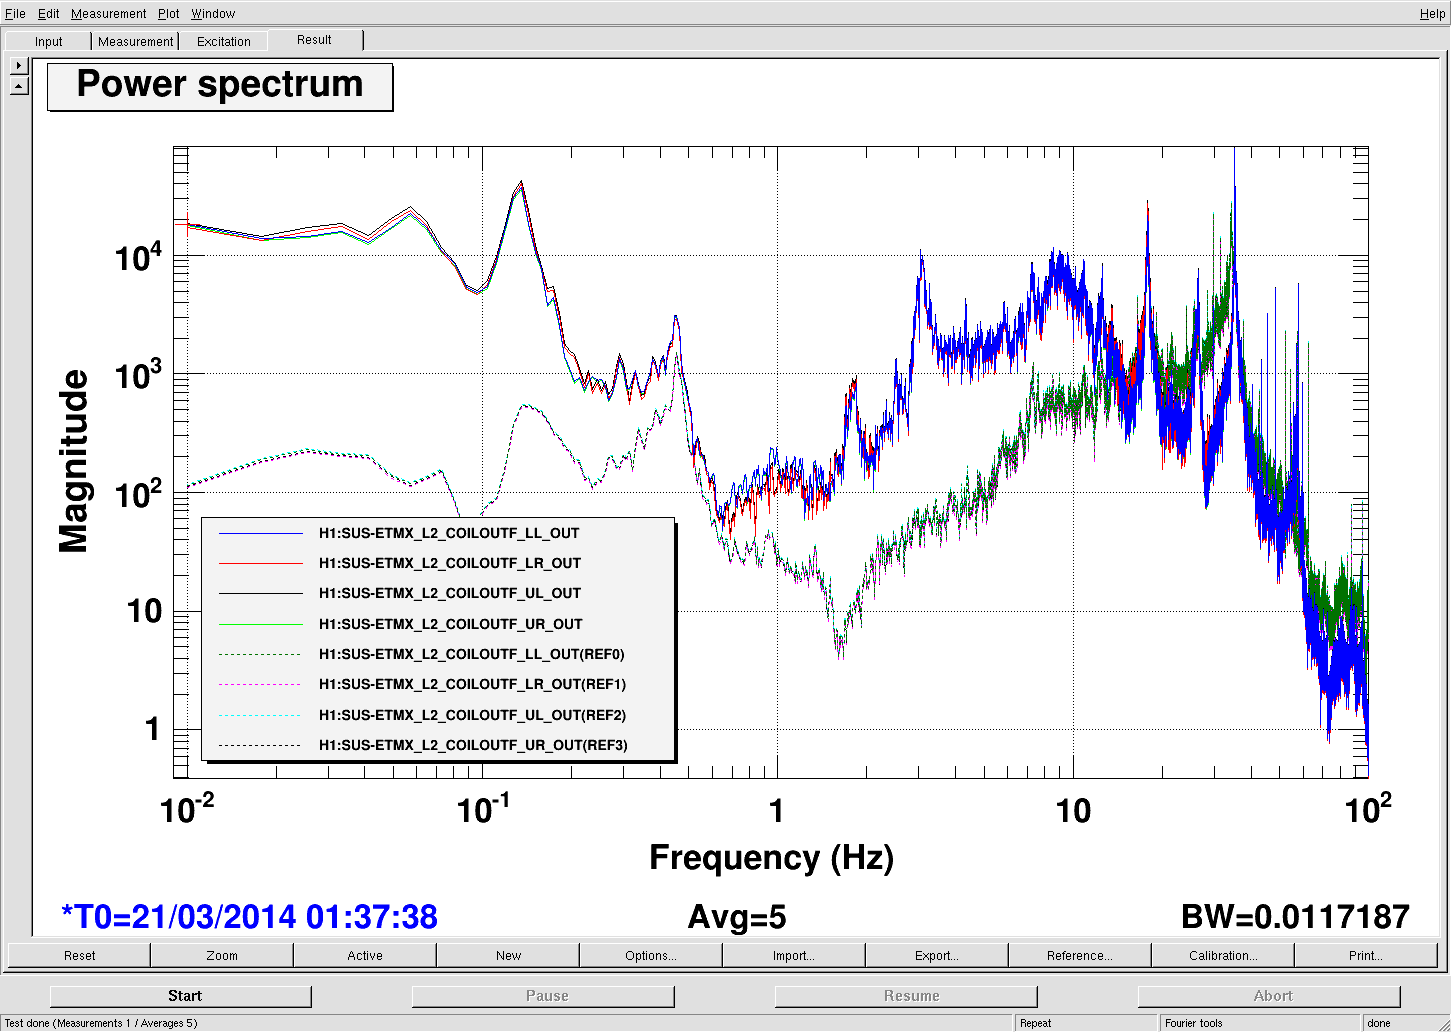
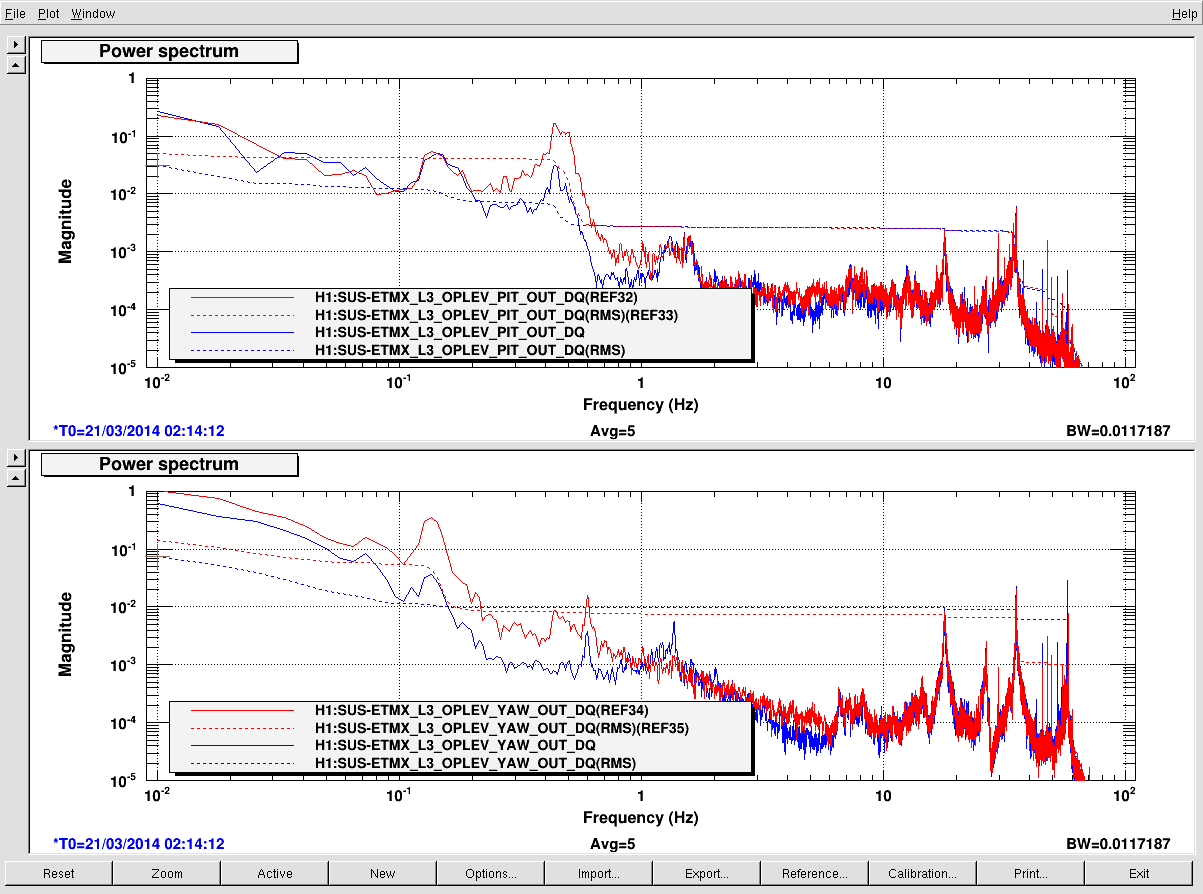
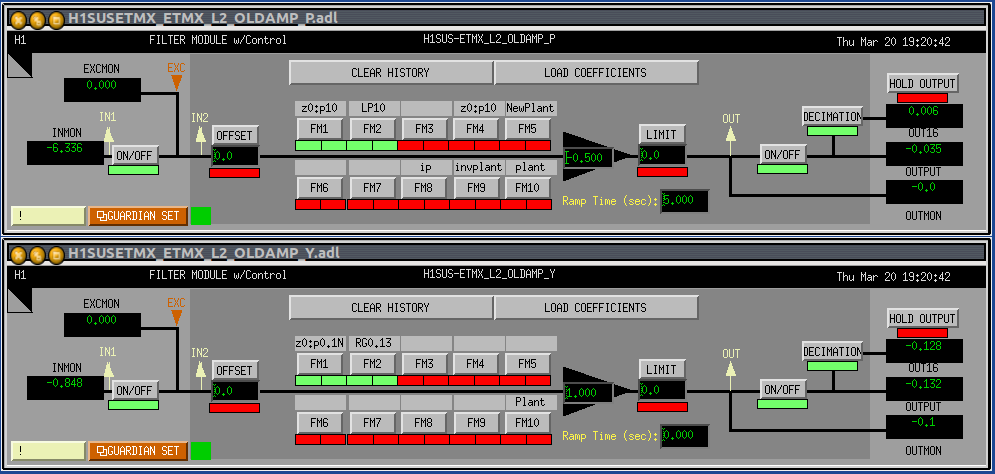
Mar 18 18:17 install-h1susetmx_2014_17_18_18:17:23
Mar 18 18:17 install-h1susetmx_2014_17_18_18:17:32
Mar 18 18:19 install-h1susetmx_2014_19_18_18:19:17
Mar 18 18:21 install-h1iopseiey_2014_21_18_18:21:27
Mar 18 18:22 install-h1hpietmy_2014_22_18_18:22:18
Mar 18 18:23 install-h1isietmy_2014_22_18_18:22:44
Mar 18 18:23 install-h1isietmx_2014_23_18_18:23:13
Mar 18 18:23 install-h1iopiscey_2014_23_18_18:23:46
Mar 18 18:24 install-h1pemey_2014_24_18_18:24:14
Mar 18 18:24 install-h1iscex_2014_24_18_18:24:52
Mar 18 18:25 install-h1odcy_2014_25_18_18:25:11
Mar 18 18:25 install-h1odcx_2014_25_18_18:25:26
Mar 18 18:25 install-h1iopsusauxey_2014_25_18_18:25:55
Mar 18 18:26 install-h1iopsusauxex_2014_26_18_18:26:05
Mar 18 18:27 install-h1susauxex_2014_26_18_18:26:59
Mar 18 18:28 install-h1susetmx_2014_28_18_18:28:17
I had a look at the IMC ODC summary around the times stated above and the ODC reports the IMC is green for the following times (in PDT): 16:30:39 - 16:31:40 17:50:31 - 17:50:32 17:50:36 - 17:50:38 17:51:00+ I've also attached a plot showing the IMC ODC over a 3 hour time period which includes the times of interest (plot starts at 16:30 PDT)
After Travis had notified me of a problem on ETMy where the copper clamps on the ring heater were touching when it was moved into final position I went in chamber and made some adjustments to keep the upper and lower clamps separated. Decided to check if the same problem existed on ITMx and ITMy. Unfortunately, ITMy had part of its macor break while I was adjusting the copper clamps. ITMx had the glass former break sometime after it's installation onto the lower quad. Both lower ring heaters have been removed.
[ FYI ... There is a specially designed Ring Heater Segment Replacement Fixture (D1101253), which is to be used ANY time a segment needs to be removed from a QUAD, if a dummy mass or a TM is also on the QUAD ]
Note, the ITMx unit has already been stripped of it's lowest dummy mass in prep to load the new glass mass later this week. So, the ITMx unit had extremely easy access for this RH work and no fixturing was required.
It's worse than I originally thought. The glass former broke along with the macor on the ITMy lower ring heater.
Apparently, damage was done (also) to the very tip-end of the glass former when the adjustment was made (14-March) to the copper clamp plates of the lower RH segment (assembly D1001895-v8 SN-210) on the ITM-Y quad. This damage was not revealed until the lower segment was dis-assembled. Photos are attached.
Regarding the lower ITM-Y assembly issues, see the attached (PDF) package of images.
The following feedback (attached) has been received, as guidance, from SYS